Quantcast
Channel: VBForums - CodeBank - Visual Basic 6 and earlier
Viewing all 1508 articles
Browse latest View live

Getting OS, Ram, CPU information

$
0
0
Over the years I have used many methods for getting the above information. None have been entirely satisfactory or involved long code.

Recently I came across the WMI classes that are part of all Windows machines (certainly since XP) and make the job quite simple.

Here is a quick demo with a very simple presentation via a Message box. I urge you to investigate for yourselves all the classes available.

All my tests have been on Win10, so I would be grateful if others would report their findings.

Code:

Option Explicit

Private Sub Form_Load()
    Dim Results As Object, Info As Object, PCInfo As String, Ram As String, TotMem As Long

    ' Get the Memory information. For more information from this query, see: https://msdn.microsoft.com/en-us/library/aa394347(v=vs.85).aspx
    Set Results = GetObject("Winmgmts:").ExecQuery("SELECT Capacity FROM Win32_PhysicalMemory")
    For Each Info In Results
        TotMem = TotMem + (Info.Capacity / 1073741824) 'Capacity returns the size separately for each stick in bytes. Therefore we loop and add whilst dividing by 1GB.
    Next Info

    ' Get the O.S. information. For more information from this query, see: https://msdn.microsoft.com/en-us/library/aa394239(v=vs.85).aspx
    Set Results = GetObject("Winmgmts:").ExecQuery("SELECT Caption,Version,ServicePackMajorVersion,ServicePackMinorVersion,OSArchitecture,TotalVisibleMemorySize FROM Win32_OperatingSystem")
    For Each Info In Results 'Info.Version can be used to calculate Windows version. E.G. If Val(Left$(Info.Version,3)>=6.1 then it is at least Windows 7.
        PCInfo = Info.Caption & " - " & Info.Version & "  SP " & _
            Info.ServicePackMajorVersion & "." & _
            Info.ServicePackMinorVersion & "  " & Info.OSArchitecture & "  " & vbNewLine
        Ram = "Installed RAM: " & Format$(TotMem, "0.00 GB (") & Format$(Info.TotalVisibleMemorySize / 1048576, "0.00 GB usable)") 'Divide by 1MB to get GB
    Next Info

    ' Get the C.P.U. information. For more information from this query, see: https://msdn.microsoft.com/en-us/library/aa394373(v=vs.85).aspx
    Set Results = GetObject("Winmgmts:").ExecQuery("SELECT Name,AddressWidth,NumberOfLogicalProcessors,CurrentClockSpeed FROM Win32_Processor")
    For Each Info In Results
        PCInfo = PCInfo & Info.Name & "  " & Info.AddressWidth & _
            "-bit." & vbNewLine & Info.NumberOfLogicalProcessors & _
            " Cores " & Info.CurrentClockSpeed & "MHz.  " & Ram
    Next Info

    Set Results = Nothing
    MsgBox PCInfo
End Sub
Attached Images
 

[VB6] Code Snippet: Load Language Specific resource String. FindResourceEx

$
0
0
This came up in another thread.
A lot of declarations out there for FindResourceEx for VB6 aren't too accurate, probably a relic of people still using APIViewer or the like.

FindStringResourceEx() was translated from the C routine by Raymond Chen.
https://blogs.msdn.microsoft.com/old...0-00/?p=40813/

And Delphi version from this blog.
https://wiert.me/2014/07/17/delphi-a...pecific-lcids/

Unicode Compliant.

Code:

Option Explicit

Private Declare Function LoadLibrary Lib "kernel32" Alias "LoadLibraryW" (ByVal lpLibFileName As Long) As Long
Private Declare Function FreeLibrary Lib "kernel32" (ByVal hLibModule As Long) As Long
Private Declare Function FindResourceEx Lib "kernel32" Alias "FindResourceExW" (ByVal hModule As Long, ByVal lpType As Long, ByVal lpName As Long, ByVal wLanguage As Integer) As Long
Private Declare Function LoadResource Lib "kernel32" (ByVal hInstance As Long, ByVal hResInfo As Long) As Long
Private Declare Function LockResource Lib "kernel32" (ByVal hResData As Long) As Long
Private Declare Function SysReAllocStringLen Lib "oleaut32" (ByVal pBSTR As Long, ByVal psz As Long, ByVal Length As Long) As Long
Private Declare Function GetMem2 Lib "msvbvm60" (Src As Any, Dst As Any) As Long
Private Const RT_STRING As Long = 6&

Private Property Get DUInt(ByVal Address As Long) As Long
    ' dereference a WORD* and copy to LOWORD of a Long
    GetMem2 ByVal Address, DUInt
End Property

'https://blogs.msdn.microsoft.com/oldnewthing/20040130-00/?p=40813/
Function FindStringResourceEx(ByVal hInstance As Long, uId As Long, langId As Long) As String
    Dim hResource As Long
    Dim hGlobal As Long
    Dim pwsz As Long, i As Long
    Const STRINGS_PER_BUCKET As Long = 16&
   
    hResource = FindResourceEx(hInstance, RT_STRING, uId \ STRINGS_PER_BUCKET + 1, langId)
    If (hResource) Then
        hGlobal = LoadResource(hInstance, hResource)
        If (hGlobal) Then
            pwsz = LockResource(hGlobal)
            If (pwsz) Then
                For i = 1 To (uId And (STRINGS_PER_BUCKET - 1))
                    pwsz = pwsz + 2 + 2 * DUInt(pwsz)
                Next
                SysReAllocStringLen VarPtr(FindStringResourceEx), pwsz + 2, DUInt(pwsz)
            End If
        End If
    End If
End Function

Private Sub Form_Click()
    Const YES_CAPTION = 805
    Const LANG_ID_ENGLISH_US = 1033
   
    Dim hModule As Long
    hModule = LoadLibrary(StrPtr("user32"))
    If (hModule) Then
        Debug.Print FindStringResourceEx(hModule, YES_CAPTION, 1033)
        FreeLibrary hModule
    End If
End Sub

VB6: Windows 10 Known Folders / SHGetKnownFolderPath

$
0
0
In Windows XP, the recommended practice to find special folders was to call SHGetFolderPath(), but this was deprecated starting in Windows Vista. From Vista on, we're supposed to use SHGetKnownFolderPath(). Unfortunately, it's extremely hard to find easy-to-use code for SHGetKnownFolderPath without having to add unnecessary references or components to your project. (typelibs, or scripting objects.)

Thanks to Randy Birch's excellent sample code, here's an easy-to-use module that lets you identify special folders using API calls, no references or components needed. Simply add the attached module to your project, then call the following function:

?KnownFolder(enumerated value)

You can call the following from the debug window to see a list of known folders and their values:

KnownFolderList


The module contains two compiler directives:
Code:

#Const IncludeVirtualFolders = False
#Const IncludeDebugListing = True

Of the 88 total known folders, only 54 return any value for me. The rest are listed as virtual folders by Randy Birch's sample project. I've moved these 34 virtual folders to the end of the enumeration and wrapped them in compiler directives, letting you easily prevent them from being included. This helps reduce clutter in the enumeration dropdown.

The second compiler directive lets you discard the KnownFoldersList() debug window output routines to reduce the size of the code in your finished project.

Here's the known folder enumeration for reference:
Code:

Public Enum KnownFolderEnum
    kfUserProfiles
    kfUser
    kfUserDocuments
    kfUserContacts
    kfUserDesktop
    kfUserDownloads
    kfUserMusic
    kfUserPictures
    kfUserSavedGames
    kfUserVideos
    kfUserAppDataRoaming
    kfUserAppDataLocal
    kfUserAppDataLocalLow
    kfUserCDBurning
    kfUserCookies
    kfUserFavorites
    kfUserGameTasks
    kfUserHistory
    kfUserInternetCache
    kfUserLinks
    kfUserNetHood
    kfUserPrintHood
    kfUserQuickLaunch
    kfUserRecent
    kfUserSavedSearches
    kfUserSendTo
    kfUserStartMenu
    kfUserStartMenuAdminTools
    kfUserStartMenuPrograms
    kfUserStartMenuStartup
    kfUserTemplates
    kfPublic
    kfPublicDesktop
    kfPublicDocuments
    kfPublicDownloads
    kfPublicMusic
    kfPublicPictures
    kfPublicVideos
    kfPublicStartMenu
    kfPublicStartMenuAdminTools
    kfPublicStartMenuPrograms
    kfPublicStartMenuStartup
    kfPublicGameTasks
    kfPublicTemplates
    kfProgramData
    kfWindows
    kfSystem
    kfSystemX86
    kfSystemFonts
    kfSystemResourceDir
    kfProgramFilesX86
    kfProgramFilesCommonX86
    kfProgramFiles
    kfProgramFilesCommon
#If IncludeVirtualFolders = True Then
    kfAddNewPrograms
    kfAppUpdates
    kfChangeRemovePrograms
    kfCommonOEMLinks
    kfComputerFolder
    kfConflictFolder
    kfConnectionsFolder
    kfControlPanelFolder
    kfGames
    kfInternetFolder
    kfLocalizedResourcesDir
    kfNetworkFolder
    kfOriginalImages
    kfPhotoAlbums
    kfPlaylists
    kfPrintersFolder
    kfProgramFilesX64
    kfProgramFilesCommonX64
    kfRecordedTV
    kfRecycleBinFolder
    kfSampleMusic
    kfSamplePictures
    kfSamplePlaylists
    kfSampleVideos
    kfSEARCH_CSC
    kfSEARCH_MAPI
    kfSearchHome
    kfSidebarDefaultParts
    kfSidebarParts
    kfSyncManagerFolder
    kfSyncResultsFolder
    kfSyncSetupFolder
    kfTreeProperties
    kfUsersFiles
#End If
#If IncludeDebugListing = True Then
    kfKnownFolders
#End If
End Enum

The order of the enumerated values doesn't matter, so feel free to pick and choose any of the virtual folders to include by moving them above the compiler directive. Be sure to make the same change to the two functions: KnownFolderGUID() and KnownFolderName(). Alternately, you could move many (most?) of the values to inside the directive to streamline the enumerated list, showing only those values you might actually need.
Attached Files

VB6 RC5-CoreAudio-Demo

$
0
0
Here a small CoreAudio-Example, based on the appropriate abstraction-Classes of the RichClient.
(as mentioned and requested in this thread): http://www.vbforums.com/showthread.p...ther-like-Game

CoreAudio was introduced as the new (LowLevel) SoundAPI for Win-Versions from Vista onwards.

It allows such things as "InApp-Session-VolumeControl, Soundbuffer-reading and -writing, Enumeration of
Sound-Devices, Fine-Control over each of the channels of e.g. a "5+1" SoundCard etc...

The Read-direction of CoreAudio-SoundBuffers I've already covered in this older example here:
http://www.vbforums.com/showthread.p...and-onwards%29
(visualizing the Buffer-Input, which comes in over: ...GetDefaultAudioEndpoint(eCapture, eCommunications) -> usually the microphone).

This example here is focusing on demonstrating the handling of "InApp-SoundVolume/Muting" -
and the SoundRendering of 4 smaller SoundBuffers (which reside as *.mp3 in the Apps \Res\-SubFolder).
Here the Zip: CoreAudioDemo.zip

With relatively low efforts, one could expand on this Demo, to e.g. implement a nice
"Piano-Roll-like Sequencer" - or something alike (as seen in some Phone- or -Tablet-Apps, that cover
simple "SoundLoop-Pattern-Mixers" which support live-changes of "correctly fitted" Sample-Loops).

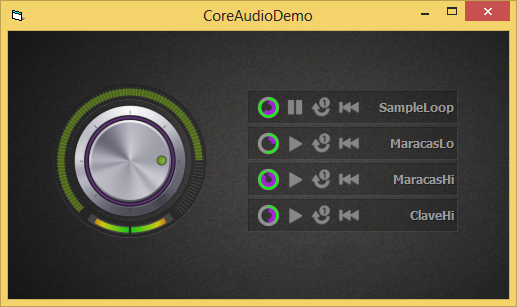
Here's a ScreenShot, what the Demo currently looks like:


The 4 SoundSample-Player-Widgets to the right of the above Form can be:
- in case of the Top-Widget, labelled 'SampleLoop' - switched On and Off permanently
- and the lower three Sound-Widgets are in "Tap-Mode" (acting more like a little Drum-Kit)

So you can Switch-On the TopMost Sound - it will be in repeat-mode by default -
and then you can add sound by "tapping" the other three (if you keep the Mouse down,
the 3 Tap-Widgets will repeat themselves in a timely fashion).

So, whilst the right part of the above ScreenShot demonstrates the CoreAudio-SoundBuffer-Handling,
the left part of the Screen (the rotating Knob-Widget) demonstrates the interaction with:
- cSimpleAudioVolume (responsible for interaction with the InApp-SoundLevel and InApp-Muting)
- cAudioMeterInformation (responsible for the Peak-Meter-Visualization at the bottom of the Knob).

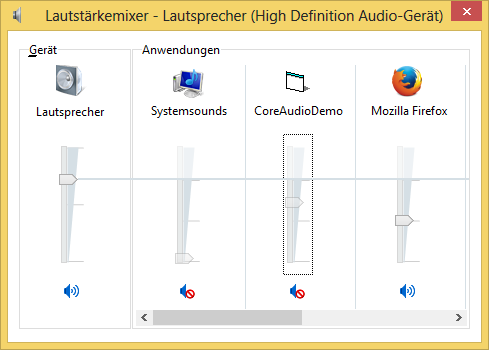
This InApp-AudioVolume-Handling works in a "two-way-fashion", since it is also present in
the new WinSystem-Mixer-Dialogues:


In the above ScreenShot, the focused Entry labeled "CoreAudioDemo" allows to
control your InApp-SoundVolume/Muting as well - and should be properly reflected
in the appropriate Control of your App, so that both GUI-interactions remain "synced"
(the Knob reflecting the Settings of the System-Dialogue, and vice versa).


The cSimpleAudioVolume-Class of the RC5 offers the needed Events for that kind of
two-way interaction.

But take a look at the code yourself, play around a bit - and just ask when something is not clear.

Have fun!

Olaf
Attached Files

[VB6, Vista+] Core Audio Basics

$
0
0

Core Audio Demos

A few days ago I released the latest version of my oleexp typelib containing all of the Core Audio interfaces. Here's a demo of some of the basic features.

All of the functions shown in the above screenshot work, and additionally the 'Mute Default Multimedia Device' button also demonstrates how to set a callback for that device-- if any other app, like the volume mixer, then unmutes or does something else with that device, your app will be notified of the change. Note that all interfaces used for the callback must be module-level and not released while the callback is active, otherwise your app will freeze.

Requirements
-Windows Vista or higher
-oleexp v3.6 (released 16 May 2016): Add oleexp3.tlb as a reference-- for IDE only, does not need to be redistributed with compiled app.
-All 3 oleexp addons: mCoreAudio.bas, mIID.bas, and mPKEY.bas (all of which are now included in main oleexp download, and all were updated with v3.6 with Core Audio related code. They're also included in this project's zip, although oleexp3.tlb is not).

Code Example: Muting all active capture devices (e.g. microphones)
Code:

Dim sOut As String
Dim i As Long
Dim lp As Long
Dim s1 As String
Dim sName As String

Dim pDvEnum As MMDeviceEnumerator
Set pDvEnum = New MMDeviceEnumerator

Dim pDvCol As IMMDeviceCollection

pDvEnum.EnumAudioEndpoints eCapture, DEVICE_STATE_ACTIVE, pDvCol

If (pDvCol Is Nothing) = False Then
    Dim nCount As Long
    Dim pDevice As IMMDevice
    If pDvCol.GetCount(nCount) = S_OK Then
        If nCount > 0 Then
            For i = 0 To (nCount - 1)
                sName = GetDeviceName(pDvCol, i)
                sOut = sOut & "Muting Device(" & i & ", Name=" & sName & ")..." & vbCrLf
                pDvCol.Item i, pDevice
                If (pDevice Is Nothing) = False Then
                    Dim pAEV As IAudioEndpointVolume
                    pDevice.Activate IID_IAudioEndpointVolume, CLSCTX_INPROC_SERVER, CVar(0), pAEV
                    If (pAEV Is Nothing) = False Then
                        If pAEV.SetMute(1, UUID_NULL) = S_OK Then
                            sOut = sOut & "...Device successfully muted!" & vbCrLf
                        Else
                            sOut = sOut & "...Failed to mute device " & i & " (" & sName & "). Already muted?" & vbCrLf
                        End If
                    Else
                        Debug.Print "Failed to set pAEV"
                        sOut = sOut & "...An error occured accessing the volume control." & vbCrLf
                    End If
                Else
                    Debug.Print "Failed to set pDevice"
                    sOut = sOut & "...Failed to get pointer to device." & vbCrLf
                End If
            Next
        Else
            sOut = "No active devices found." & vbCrLf
        End If
    Else
        Debug.Print "Failed to get device count."
        sOut = sOut & "An error occured getting the device count." & vbCrLf
    End If
Else
    Debug.Print "Failed to set pDvCol"
    sOut = "Failed to get device collection (no active devices or an error occured)"
End If
Text1.Text = sOut

Attached Files

[VB6] Loader, shellcode, without runtime...

$
0
0
Hello everyone! Today i want to show you the quite interesting things. One day i was investigating the PE (portable executable) file format especially EXE. I decided to create a simple loader of the executable files specially for VB6-compiled applications. This loader should load an VB6-compiled exe from the memory without file. THIS IS JUST FOR THE EXPERIMENTAL PURPOSES IN ORDER TO CHECK POSSIBILITIES OF VB6. Due to that the VB6-compiled applications don't used most of the PE features it was quite simple objective. Most of programers says that a VB6-apllication is linked with the VB6 runtime (MSVBVM), a VB6 application doesn't work without the runtime and the runtime is quite slow. Today i'll prove that it is possible to write an application that absolutely doesn't use runtime (although i was already doing that in the driver). These projects i had written quite a long time ago, but these were in the russian language. I think it could be quite interesting for someone who wants to examine the basic principles of work with the PE files.
Before we begin i want to say couple words about the projects. These projects were not tested well enough therefore it can cause problems. The loader doesn't support most of the features of PE files therefore some executables may not work.
So...
This overview consists three projects:

  1. Compiler - it is the biggest project of all. It creates an installation based on the loader, user files, commands and manifest;
  2. Loader - it is the simple loader that performs commands, unpacks files and runs an executable from memory;
  3. Patcher - it is the small utility that removes the runtime import from an executable file.

I call an exe that contains the commands, files and executable file the installation. The main idea is to put the information about an installation to the resources of the loader. When the loader is being loaded it reads the information and performs the commands from resources. I decided to use an special storage to save the files and exe, and other storage for commands.
The first storage stores all the files that will be unpacked, and the main executable that will be launched. The second storage stores the commands that will be passed to the ShellExecuteEx function after unpacking process will have been completed. The loader supports the following wildcards (for path):

  1. <app> - application installed path;
  2. <win> - system windows directory;
  3. <sys> - System32 directory;
  4. <drv> - system drive;
  5. <tmp> - temporary directory;
  6. <dtp> - user desktop.

Compiler.


Name:  Compiler.png
Views: 63
Size:  20.5 KB

This is the application that forms the installation information and puts it to the loader resource. All the information is stored in a project. You can save and load a project from file. The clsProject class in VB project represents the compiler-project. This compiler has 3 sections: storage, execute, manifest.
The 'storage' section allows to add the files that will be copied when the application is being launched. Each item in the list has flags: 'replace if exists', 'main executable', 'ignore error'. If you select 'replace if exists' flag a file will be copied even if one exists. The 'main executable' flag can be set only for the single executable file. It means that this file will be launched when all the operations have been performed. The 'ignore error' flag makes ignore any errors respectively. The order in the list corresponds the order of extracting the files except the main executable. The main executable is not extracted and is launched after all the operations. The storage section is represented as clsStorage class in the VB project. This class implements the standard collection of the clsStorageItem objects and adds some additional methods.The MainExecutable property determines the index of main executable file in the storage. When this parameter equal -1 executable file is not presented. The clsStoragaItem class represent the single item in the storage list. It has some properties that determine the behavior of item. This section is helpful if you want to copy files to disk before execution of the application.
The next section is the 'execute'. This section allows execute any commands. This commands just pass to ShellExecuteEx function. Thus you can register libraries or do something else. Each item in the execution list has two properties: the executable path and parameters. Both the path and the parameters is passed to ShellExecuteEx function. It is worth noting that all the operations is performed synchronously in the order that set in the list. It also has the 'ignore error' flag that prevents appearance any messages if an error occurs. The execute section is represented as two classes: clsExecute and clsExecuteItem. These classes are similar to the storage classes.
The last section is 'manifest'. It is just the manifest text file that you can add to the final executable. You should check the checkbox 'include manifest' in the 'manifest' tab if you wan to add manifest. It can be helpful for Free-Reg COM components or for visual styles.
All the classes refer to the project object (clsProject) that manages them. Each class that refers to project can be saved or loaded to the PropertyBag object. When a project is being saved it alternately saves each entity to the property bag, same during loading. It looks like a IPersistStream interface behavior. All the links to the storage items in the project is stored with relative paths (like a VB6 .vbp file) hence you can move project folder without issues. In order to translate from/to relative/absolute path i used PathRelativePathTo and PathCanonicalize functions.
So... This was basic information about compiler project. Now i want to talk about compilation procedure. As i said all the information about extracting/executing/launching is stored to the loader resources. At first we should define the format of the data. This information is represented in the following structures:
Code:

' // Storage list item
Private Type BinStorageListItem
    ofstFileName        As Long            ' // Offset of file name
    ofstDestPath        As Long            ' // Offset of file path
    dwSizeOfFile        As Long            ' // Size of file
    ofstBeginOfData    As Long            ' // Offset of beginning data
    dwFlags            As FileFlags      ' // Flags
End Type

' // Execute list item
Private Type BinExecListItem
    ofstFileName        As Long            ' // Offset of file name
    ofstParameters      As Long            ' // Offset of parameters
    dwFlags            As ExeFlags        ' // Flags
End Type

' // Storage descriptor
Private Type BinStorageList
    dwSizeOfStructure  As Long            ' // Size of structure
    iExecutableIndex    As Long            ' // Index of main executable
    dwSizeOfItem        As Long            ' // Size of BinaryStorageItem structure
    dwNumberOfItems    As Long            ' // Number of files in storage
End Type

' // Execute list descriptor
Private Type BinExecList
    dwSizeOfStructure  As Long            ' // Size of structure
    dwSizeOfItem        As Long            ' // Size of BinaryExecuteItem structure
    dwNumberOfItems    As Long            ' // Number of items
End Type

' // Base information about project
Private Type BinProject
    dwSizeOfStructure  As Long            ' // Size of structure
    storageDescriptor  As BinStorageList  ' // Storage descriptor
    execListDescriptor  As BinExecList    ' // Command descriptor
    dwStringsTableLen  As Long            ' // Size of strings table
    dwFileTableLen      As Long            ' // Size of data table
End Type

The 'BinProject' structure is located at beginning of resource entry. Notice that project is stored as RT_RCDATA item with 'PROJECT' name. The dwSizeOfStructure field defines the size of the BinProject structure, storageDescriptor and execListDescriptor represent the storage and execute descriptors respectively. The dwStringsTableLen field shows the size of strings table. The strings table contains all the names and commands in the unicode format. The dwFileTableLen field shows the size of all data in the storage. Both storage (BinStorageList) and execute list (BinExecList) have dwSizeOfItem and dwSizeOfStructure fields that define the size of a descriptor structure and the size of a list item. These structures also have dwNumberOfItems field that shows how many items is contained in the list. The 'iExecutableIndex' field contains the index of executable file that will be launched. The common structure of a project in the resources is shown in this figure:
Name:  BinProject.png
Views: 61
Size:  60.3 KB
An item can refers to the strings table and file table for this purpose it uses the offset from beginning of a table. All the items is located one by one. Okay, you have explored the internal project format now i tell how can you build the loader that contains these data. As i said we store data to resources of the loader. I will tell about the loader a little bit later now i want to note one issue. When you put the project data to resources it doesn't affect to exe information. For example if you launch this exe the information contained in the resources of the internal exe won't be loaded. Same with icons and version information. You should copy the resources from the internal exe to loader in order to avoid this troubles. WinAPI provides the set of the functions for replacing resources. In order to obtain the list of resources you should parse the exe file and extract data. I wrote the 'LoadResources' function that extract all the resources of specified exe data to array.
Attached Images
  

[VB6] TrickSound - class for working with audio.

$
0
0

Hi everyone!
I've created the new version of my clsTrickSound class that i used in the vocoder project. This class provides the simple interface to playback and capture sound. It doesn't require any dependencies and works autonomously. This class has the NewData event that is raised when the internal buffer with sound data has been filled or a device requires the new part of sound data. In order to playback sound you should call the InitPlayback function, to capture - InitCapture. Then you should call StartProcess in order to begin playback/capture. I've made the two examples of the usage of this class: simple synthesizer and simple recorder. Thanks for attention.
Regards,
Кривоус Анатолий (The trick).
Attached Files

Windowless Buttons

$
0
0
Typically, buttons (or any other control for that matter) in VB6 are windows, who's window function is designed to handle clicks. Each window has its own handle called an hWnd. However, this has some downsides, particularly when it comes to security. This is because windows can be "hooked" by malware which can then check to see when you click on a button. If the malware is advanced enough it can hook all the events in all the windows, allowing the hacker who's receiving the info from the malware to tell exactly what windows are being clicked, typed in, etc. This allows them to literally map out every moment of your computer usage. For example, it allows them to tell not only what is being typed at any given moment, but also that the fact that what you typed is in a password box (if the text in the titlebar of the window is "password"), so as to clue them in on the importance of what is being typed (in this example, the fact that it is a password).

This is where my sample program comes into play. It prevents malware from determining every single minutia of what you are doing on your computer, by making all of the activity on the window (as far as malware that hooks hWnds is concerned) to all be happening on the same window, preventing a significant amount of information from being leaked from your computer to a hacker. It does this by implementing windowless controls (buttons in this sample program, but I could also extend it to windowless text boxes, check boxes, etc, if given enough time to code all of that). It works by allowing each button to have its own instance of a class called NonWndButton. The only hWnd in the entire program is the one for Form1. This significantly obfuscates the activity that the user performs on the form.


Here's a description of each of the code files in this program.
Windowless Button.frm: This is the form for the program, and has all the code to handle user interactions, as well as an implementation of the NonWndButtonCallback interface.

NonWndButton.cls: This is the class that has code for just drawing the button and handling events.

NonWndButtonCallback.cls: This is actually an interface, that must be implemented in the form (Form1 in my program). This allows for callbacks from the button class so that code for handling what each button does can be directly coded in the form, rather than in the separate class file for the buttons.

modNonWndButton.bas: This is the module file that handles the framework for the buttons, including a method for adding buttons (button class instances) to the Buttons collection which is also contained in this module, as well as one for redrawing the buttons, which is necessary after a screen clearing (as happens when the Cls method). If you wanted to clear text or other graphics on the screen via Cls, but keep the buttons (as these are the main controls now), you absolutely need to be able to redraw them. Also in this module is a method for scanning the buttons when a click occurs on the form, to determine which button actually got clicked, so as to trigger ButtonUp or ButtonDown event of the correct instance of the button class.

GdiModule.bas: This contains declarations and methods needed to perform the basics of drawing text and rectangles. This is necessary for actually rendering the buttons on the screen.


Attached to this post is a zip file containing the complete source code, including the vbp project file and vbw project layout file.
Attached Files

[VB6] Palettize - A VB6 Class for converting StdPicture to 8-bit StdPicture

$
0
0
The main reason you might want this is for creating an 8-bit color or grayscale StdPicture from a StdPicture created by loading an image file. An 8-bit color StdPicture may save "smaller" as a BMP file if required.

Since this also tends to result in a "posterized" image due to the simplistic color quantization algorithm used here, 8-bit color StdPicture creation also handles color depths from 32-colors to the default 256-colors. This might be useful if your goal is posterization or you want an even smaller saved image, but otherwise it is usually pointless.

This is written entirely in VB6 and doesn't require any 3rd party DLLs or even TLBs. It also runs pretty fast.

There are two methods, one for color and one for grayscale (and yes, if you prefer to spell it "grey" feel free to do a replace on the source code). ;)


Palettize.cls is a VB_PredeclaredId = True class, so you do not need to create instances of it to use it. It also depends on the included OList.cls for color palette processing though that helper class is not needed if you delete all of the color processing to keep just the grayscale processing.

There is also a PicSave.cls included in the demo. This is also a VB_PredeclaredId = True class. It can be used to save a StdPicture as BMP, GIF, JPEG, or PNG. Palettize.cls does not need this. You'd only use this sort of thing to save in more formats than just BMP (via plain old VB6 SavePicture).


Name:  sshot.jpg
Views: 50
Size:  36.4 KB

Screenshot of the demo Project


It can benefit from native-compilation optimizations and this demo has the relevant ones turned on. Compile the Project and test the EXE to see it run at full speed.

Most of the size of the attachment is due to a pair of "photographic" sample images. You could change the program to load different images, or replace the two samples by your own for further testing. The demo is just something to test with.

Actual usage is simple: Add OList.cls and Palettize.cls to your VB6 Project. Add PicSave.cls if you want to use that too. Then you can just call the methods of the global predeclared instance Palettize, passing a StdPicture argument and getting a new StdPicture back as the return value.
Attached Images
 
Attached Files

[VB6] Full Screen a Form

$
0
0
This class was converted from the Chromium project.

CFullScreenHandler.cls
Code:

' Chromium full_screen_handler.h/.cc converted to VB6
' CFullScreenHandler.cls
''''''''''''''''''''''''''''''''''''''''''''''''''''''''''''''''''''''''''''''''''''''''''''''''''''''''''''''''''''''''
Option Explicit


''''''''''''''''''''''''''''''''''''''''''''''''''''''''''''''''''''''''''''''''''''''''''''''''''''''''''''''''''''''''
' WIN32 API
''''''''''''''''''''''''''''''''''''''''''''''''''''''''''''''''''''''''''''''''''''''''''''''''''''''''''''''''''''''''
Private Declare Function GetActiveWindow Lib "user32" () As Long
Private Declare Function IsZoomed Lib "user32" (ByVal hWnd As Long) As Long
Private Declare Function SendMessage Lib "user32" Alias "SendMessageW" (ByVal hWnd As Long, ByVal Msg As Long, ByVal wParam As Long, lParam As Any) As Long
Private Const WM_SYSCOMMAND As Long = &H112
Private Const SC_RESTORE As Long = &HF120&
Private Const SC_MAXIMIZE As Long = &HF030&
Private Declare Function GetWindowLong Lib "user32" Alias "GetWindowLongW" (ByVal hWnd As Long, ByVal nIndex As Long) As Long
Private Const GWL_STYLE As Long = -16
Private Const GWL_EXSTYLE As Long = -20
Private Declare Function SetWindowLong Lib "user32" Alias "SetWindowLongW" (ByVal hWnd As Long, ByVal nIndex As Long, ByVal dwNewLong As Long) As Long
Private Type RECT
    Left As Long
    Top As Long
    Right As Long
    Bottom As Long
End Type
Private Declare Function GetWindowRect Lib "user32" (ByVal hWnd As Long, lpRect As RECT) As Long
Private Const WS_CAPTION As Long = &HC00000
Private Const WS_THICKFRAME As Long = &H40000
Private Const WS_EX_DLGMODALFRAME As Long = &H1&
Private Const WS_EX_WINDOWEDGE As Long = &H100&
Private Const WS_EX_CLIENTEDGE As Long = &H200&
Private Const WS_EX_STATICEDGE As Long = &H20000
Private Type MONITORINFO
    cbSize As Long
    rcMonitor As RECT
    rcWork As RECT
    dwFlags As Long
End Type
Private Declare Function MonitorFromWindow Lib "user32" (ByVal hWnd As Long, ByVal dwFlags As Long) As Long
Private Declare Function GetMonitorInfo Lib "user32" Alias "GetMonitorInfoW" (ByVal hMonitor As Long, lpmi As Any) As Long
Private Const MONITOR_DEFAULTTONEAREST As Long = &H2
Private Declare Function SetWindowPos Lib "user32" (ByVal hWnd As Long, ByVal hWndInsertAfter As Long, ByVal x As Long, ByVal y As Long, ByVal cx As Long, ByVal cy As Long, ByVal uFlags As Long) As Long
Private Const SWP_HIDEWINDOW As Long = &H80
Private Const SWP_NOMOVE As Long = &H2
Private Const SWP_NOREPOSITION As Long = &H200
Private Const SWP_NOOWNERZORDER As Long = &H200
Private Const SWP_NOSIZE As Long = &H1
Private Const SWP_NOZORDER As Long = &H4
Private Const SWP_NOACTIVATE As Long = &H10&
Private Const SWP_FRAMECHANGED As Long = &H20

''''''''''''''''''''''''''''''''''''''''''''''''''''''''''''''''''''''''''''''''''''''''''''''''''''''''''''''''''''''''

Private Type SavedWindowInfo
    Maximized  As Boolean
    Style      As Long
    ExStyle    As Long
    WindowRect  As RECT
End Type

Private WithEvents m_Parent As Form
Private m_hWnd              As Long
Private m_FullScreen        As Boolean
Private m_MetroSnap        As Boolean
Private m_SavedWindowInfo  As SavedWindowInfo

''''''''''''''''''''''''''''''''''''''''''''''''''''''''''''''''''''''''''''''''''''''''''''''''''''''''''''''''''''''''
' Class Implementation
''''''''''''''''''''''''''''''''''''''''''''''''''''''''''''''''''''''''''''''''''''''''''''''''''''''''''''''''''''''''
Private Sub Class_Initialize()
    m_hWnd = GetActiveWindow()
End Sub

Public Function Init(Parent As Form, Optional HandleEscapeF11 As Boolean) As CFullScreenHandler
    If HandleEscapeF11 Then Set m_Parent = Parent
    m_hWnd = Parent.hWnd
    Set Init = Me
End Function

Public Property Let hWnd(Value As Long)
    m_hWnd = Value
End Property

Public Property Get FullScreen() As Boolean
    FullScreen = m_FullScreen
End Property

Public Property Let FullScreen(Value As Boolean)
    If (m_FullScreen = Value) Then Exit Property
    Call SetFullscreenImpl(Value, False)
End Property

Public Property Get MetroSnap() As Boolean
    MetroSnap = m_MetroSnap
End Property

Public Property Let MetroSnap(Value As Boolean)
    If (m_MetroSnap = Value) Then Exit Property
    Call SetFullscreenImpl(Value, True)
    m_MetroSnap = Value
End Property

Private Sub SetFullscreenImpl(ByVal FullScreen As Boolean, ByVal ForMetro As Boolean)
    'ScopedFullscreenVisibility visibility(hwnd_);  'Chrome's Multiple FullScreen handling not Implemented!

    ' Save current window state if not already fullscreen.
    If (Not m_FullScreen) Then
        ' Save current window information.  We force the window into restored mode
        ' before going fullscreen because Windows doesn't seem to hide the
        ' taskbar if the window is in the maximized state.
        m_SavedWindowInfo.Maximized = IsZoomed(m_hWnd)
       
        If (m_SavedWindowInfo.Maximized) Then _
            Call SendMessage(m_hWnd, WM_SYSCOMMAND, SC_RESTORE, ByVal 0&)
        m_SavedWindowInfo.Style = GetWindowLong(m_hWnd, GWL_STYLE)
        m_SavedWindowInfo.ExStyle = GetWindowLong(m_hWnd, GWL_EXSTYLE)
        Call GetWindowRect(m_hWnd, m_SavedWindowInfo.WindowRect)
    End If
   
    m_FullScreen = FullScreen
   
    If (m_FullScreen) Then
        ' Set new window style and size.
        Call SetWindowLong(m_hWnd, GWL_STYLE, _
                          m_SavedWindowInfo.Style And Not (WS_CAPTION Or WS_THICKFRAME))
        Call SetWindowLong(m_hWnd, GWL_EXSTYLE, _
                          m_SavedWindowInfo.ExStyle And Not (WS_EX_DLGMODALFRAME Or _
                          WS_EX_WINDOWEDGE Or WS_EX_CLIENTEDGE Or WS_EX_STATICEDGE))
                         
        ' On expand, if we're given a window_rect, grow to it, otherwise do
        ' not resize.
        If (Not ForMetro) Then
            Dim mi As MONITORINFO
            mi.cbSize = LenB(mi)
            Call GetMonitorInfo(MonitorFromWindow(m_hWnd, MONITOR_DEFAULTTONEAREST), mi)
            With mi.rcMonitor
            Call SetWindowPos(m_hWnd, NULL_, .Left, .Top, .Right - .Left, .Bottom - .Top, _
                              SWP_NOZORDER Or SWP_NOACTIVATE Or SWP_FRAMECHANGED)
            End With
        End If
    Else
        ' Reset original window style and size.  The multiple window size/moves
        ' here are ugly, but if SetWindowPos() doesn't redraw, the taskbar won't be
        ' repainted.  Better-looking methods welcome.
        Call SetWindowLong(m_hWnd, GWL_STYLE, m_SavedWindowInfo.Style)
        Call SetWindowLong(m_hWnd, GWL_EXSTYLE, m_SavedWindowInfo.ExStyle)
       
        If (Not ForMetro) Then
            ' On restore, resize to the previous saved rect size.
            With m_SavedWindowInfo.WindowRect
            Call SetWindowPos(m_hWnd, NULL_, .Left, .Top, .Right - .Left, .Bottom - .Top, _
                              SWP_NOZORDER Or SWP_NOACTIVATE Or SWP_FRAMECHANGED)
            End With
        End If
        If (m_SavedWindowInfo.Maximized) Then _
            Call SendMessage(m_hWnd, WM_SYSCOMMAND, SC_MAXIMIZE, ByVal 0&)
    End If
End Sub

Private Sub Class_Terminate()
    Set m_Parent = Nothing
End Sub

Private Sub m_Parent_KeyUp(KeyCode As Integer, Shift As Integer)
    Select Case KeyCode
    Case vbKeyEscape:  FullScreen = False
    Case vbKeyF11:      FullScreen = Not FullScreen
    End Select
End Sub

Form Code looks like this
Code:

Private m_fs    As New CFullScreenHandler

Private Sub Form_Initialize()
    m_fs.Init Me, True
End Sub

VB Multithread Library (Generic Multithreader)

$
0
0
This is a Ax-DLL (VBMThread10.DLL) for generic multithreading in VB6.

I know that there are plenty of libraries out there providing exactly this.
However, I want to share this approach and want to demonstrate how to use it.

There is only one public creatable component, the Thread class.
The Thread class is event driven and once created the new thread's main function is fired in the AsyncProcedure event.
In this event the background work will be done, as it will not lock or freeze the App.
But attention is required as showing Forms will crash VB.
Therefore in the AsyncProcedure event is a param SyncCallback. (IThreadSyncCallback class)
By this you can fire an synchronous callback. The current thread will be suspended, the method request is marshaled to the original thread.
On this SyncCallback event you can safely show forms. (as original thread)
I recommend to access project objects (classes, controls) only in the SyncCallback event.

Do not debug in the AsyncProcedure event, doing so will cause a crash.
The IDE can occasionally crash. (e.g. showing modal forms from user while a thread is running etc.)
But compiled executable should be quite stable in this regard.

Registration-Free (Side-by-side) is not supported. It must be registered normally in order to function.

List of revisions:
Code:

17-Jun-2016
- Fixed a bug in the Suspended property.
15-Jun-2016
- First release.

Attachment: VBMThread10 Ax-DLL project and a demo project.
Attached Files

[DSWC+RC5] PicSnap WebCam+Cairo Overlay Demo/Experiment

$
0
0
First, let me say that the heavy lifting in this demo has been done by the hard work of Dilettante (DSWC) and Olaf Schmidt (vbRichClient5). I've decided to experiment a bit with Olaf's RC5 widget and form classes by putting an overlay layer over the webcam work that Dilettante did in this thread: http://www.vbforums.com/showthread.p...m-Minimal-Code

Here's a screenshot to whet your appetite:

Name:  PicSnap.jpg
Views: 43
Size:  35.9 KB

As you can see we get a nice transparent overlay with semi-transparent widgets over our (now scaled to the window-size) live webcam preview. Click/Tap the top icon to cycle through your available cams (e.g. front and back cameras). Click/tap the bottom icon to take a snapshot. When you take a snapshot, the window will "flash" to indicate that the snap was taken, and a JPEG will be saved in your My Pictures folder.

This has only been tested on a Surface Pro 3 with Windows 10, and only lightly at that, so bugs are quite possible. Report issues here and I will see what I can do.

So just a bit of a fun attempt to make a camera application for dummies. Thanks once again to Olaf and Dilettante for doing the difficult stuff.

Here's the source code:

PicSnap.zip

Once you've extracted the source code, you will also need to have the vbRichClient5 library and the FSFWrap library registered on your development machine. Enjoy!
Attached Images
 
Attached Files

Fix for tabstops in the SSTab control

$
0
0
IMHO, the SSTab control is a very solid control, and I get much use out of it. However, it does have one annoying bug. When the TAB keyboard key is used, the SSTab control can pass the focus to controls on tabs that are not the current tab. In other words, the focus just sort of disappears. This is a major annoyance, and I have fixed it with the following class module. Also, an issue with combo-boxes is also corrected. See comments.

Code:

Option Explicit
'
Dim WithEvents tabCtl As SSTab
Dim frm As Form
Dim TabStops() As Boolean
'
' A primary purpose of this fix is to correctly control the tab stops.
' To make the appearance of tabs, the SSTab control simply moves the controls out of view.
' An artifact of this approach is that the controls are still able to get the focus when the
' user uses the TAB key.  The following code corrects this problem by appropriately turning
' on and off the TabStop properties of the controls as the user tabs from one tab to another.
'
' Another problem has to do with ComboBoxes.  When changing to a new tab, dropdown comboboxes
' will have their text selected.  The combobox will not have the focus, but their text will be
' selected.  The primary problem with this is that it right-justifies the text when there is more
' text than will fit in the textbox portion of the combobox, and this is confusing to users.
' This problem is corrected in the following code.
'

Friend Sub SetTabControl(TheTabControl As SSTab, TheForm As Form)
    ' Call this in the form load event.
    ' The BogusTextBox must be on the form (anywhere), and NOT the SSTab control.
    Dim ctl As Control
    Dim ptr As Long
    '
    Set tabCtl = TheTabControl
    Set frm = TheForm
    '
    ' Store the true value of the TabStops.
    ReDim TabStops(0 To frm.Controls.Count - 1)
    ' Not all controls have TabStop property, so we must set error trapping.
    On Error Resume Next
    For ptr = 0 To frm.Controls.Count - 1
        TabStops(ptr) = frm.Controls(ptr).TabStop
    Next ptr
    On Error GoTo 0
End Sub

Friend Sub SetTabStopsAccordingly()
    ' Call this in the form activate event.
    ' After this first call, it will automatically be called when the tabs change.
    Dim ctl As Control
    Dim ctlTheControlOrContainer As Control
    Dim ItsOnTheTabControl As Boolean
    Dim ptr As Long
    '
    For ptr = 0 To frm.Controls.Count - 1
        Set ctl = frm.Controls(ptr)
        Set ctlTheControlOrContainer = ctl ' The control might be on a container that's on the SSTab, rather than directly on the SSTab.
        Do
            Select Case True
            Case TypeOf ctlTheControlOrContainer.Container Is SSTab
                ItsOnTheTabControl = True
                Exit Do ' The way out.
            Case TypeOf ctlTheControlOrContainer.Container Is Form
                ItsOnTheTabControl = False
                Exit Do ' The way out.
            End Select
            Set ctlTheControlOrContainer = ctlTheControlOrContainer.Container ' Must deal with controls nested deeper than the SSTab control.
        Loop
        If ItsOnTheTabControl Then
            ' Not all controls have TabStop property, so we must set error trapping.
            On Error Resume Next
            If ctlTheControlOrContainer.Left >= 0 Then
                ctl.TabStop = TabStops(ptr) ' If it's showing, restore the original TabStop value.
                ' Must also fix the problem with combo boxes having an internal focus set.
                ctl.SelStart = 0
                ctl.SelLength = 0
            Else
                ctl.TabStop = False
            End If
            On Error GoTo 0
        End If
    Next ptr
End Sub

Private Sub tabCtl_Click(PreviousTab As Integer)
    SetTabStopsAccordingly
End Sub

Private Sub tabCtl_MouseUp(Button As Integer, Shift As Integer, X As Single, Y As Single)
    ' This allows other controls to close up when user click off.
    ' The problem is that clicking into the body of the tab control does NOT cause change in focus.
    ' The control with the focus keeps it, and it may not close up as typically happens when clicking on dead space of a form.
    ' You may also want to consider placing this "SetFocus" code on the labels on the tabs.  This is NOT automatically done
    ' because the programmer may want to use a label click for other purposes.
    tabCtl.SetFocus
End Sub

Usage is quite simple. Let's say the above class module is named clsFixTabControl. Let's further say that you have an SSTab control on your form named tabExamData. Under these conditions, all you'd need to do is the following in your form:

Code:

Option Explicit
'
Dim FixTabControl As New clsFixTabControl
'
Private Sub Form_Load()
    SubClassForFixedSize Me ' This is to accomodate the Tablet PC.

    ' possibly other code.
End Sub

Private Sub Form_Activate()
    FixTabControl.SetTabStopsAccordingly

    ' possibly other code.
End Sub

And that's it. Your tabstops will now work perfectly on your SSTab control.

Move a control from one tab to another at run-time on the SSTab control

$
0
0
It took me a bit to figure this out, and I see a bit of interest in the SSTab control, so I decided to post this. It's a procedure that allows you to change the tab of a control that's on the SSTab control at run-time.

Code:


Public Sub ChangeTheSSTab(SSctl As Control, ctl() As Control, OldTab As Long, NewTab As Long, Optional bRestoreTheTab As Boolean = False)
    ' Hide the form with the SSTab before doing this.  This will prevent flicker if you're moving several controls.
    ' You must get the OldTab correct or everything blows up. Alternatively, this procedure could have "found" it, but that wastes time.
    ' This procedure does NOT work in form_load, but it DOES work in form_activate.
    ' Also, when using this, don't forget to deal with the TabIndex if you need to !!!!
    Dim OrigTab As Long
    Dim i As Long
    '
    If bRestoreTheTab Then OrigTab = SSctl.Tab
    '
    SSctl.Tab = OldTab
    For i = LBound(ctl) To UBound(ctl)
        If TypeName(ctl(i)) = "Line" Then
            ctl(i).X1 = ctl(i).X1 - 75000
            ctl(i).x2 = ctl(i).x2 - 75000
        Else
            ctl(i).Left = ctl(i).Left - 75000
        End If
    Next i
    SSctl.Tab = NewTab
    For i = LBound(ctl) To UBound(ctl)
        If TypeName(ctl(i)) = "Line" Then
            ctl(i).X1 = ctl(i).X1 + 75000
            ctl(i).x2 = ctl(i).x2 + 75000
        Else
            ctl(i).Left = ctl(i).Left + 75000
        End If
    Next i
    '
    If bRestoreTheTab Then SSctl.Tab = OrigTab
End Sub

It's usage is fairly straightforward, at least to me. :)

Here's an example (in a Form_Activate procedure):

Code:

    Dim ctl() As Control
    '
    ' Change the SSTab of the controls.
    ReDim ctl(1 To 3)
    Set ctl(1) = txtRight1
    Set ctl(2) = txtRight2
    Set ctl(3) = txtRight3
    ChangeTheSSTab tabExamData, ctl(), 4, 2

The SSTab control is named tabExamData. There are three controls moved from tab #4 to tab #2 on the SSTab control. The position on the tab won't change, but the actual tab the controls are on will change. The ctl() is an array of controls so I can move several controls at once. This speeds things up.

Enjoy,
Elroy

VB6 - JACMAIL 2.5 - Email c/w Encryption

$
0
0
JACMail Version 2.5 is very similar to Version 1 on the surface. Under the hood however, there have been substantial changes. JACMail is an Email Client Program designed to allow fast and efficient recovery of email from a POP3 server, and the sending of email through an SMTP server. It is primarily oriented towards text based messaging with attachments, and does not directly support highly formatted HTML based email or embedded objects. It receives and stores both text/plain and text/html messages, and Web based emails (HTML) can be sent to your default browser for viewing. It also supports Plain Authentication based POP3 and multiple mailboxes. The mailboxes are stored in an Access database utilising ODBC.

The code uses IP Version independent system calls, so it will only work on Windows systems that actively support both IPv4 and IPv6. That more or less restricts it to Windows Vista or later. It has been tested on Windows Vista, Win 7, Win 8.1, and Win 10, and utilises the following standard components and references:
RICHED32.DLL
RICHTX32.OCX
COMDLG32.OCX
MSSTDFMT.DLL
MSBIND.DLL
MSADODC.OCX
MSDATGRD.OCX
which the user must have available in order to compile the program. It also uses a VB6 compiled Library file called jCrypt.dll, which is available here:
http://www.yellowhead.com/documents/jCrypt.dll
This DLL handles all the Cryptography functions, and should be copied to the %windir%\system32\ directory (%windir%\syswow64\ on 64 bit systems).

JACMAIL Version 2.0/2.5 both support message encrytion. Version 2.0 utilized RC4 for bulk encryption, which is no longer considered secure. It also used RSA to transfer the key from the server component to the client component. Version 2.5 now uses ECC (Elliptical Curve Cryptography) to transfer the encryption key. The advantage of using ECC is that keys do not need to be stored, as a different key is used every time. Even if a hacker manages to break the ECC key for one message, it is useless for the next message. Version 2.5 uses a proprietary method of encryption, and for the moment will remain so. Although any JACMail2 Client can receive and decrypt messages sent by JACMail2, the sending of encrypted messages requires a server component.

1. Sender creates Key. For example:
E2 18 F8 A9 78 C7 B4 57 5A 59 42 AE 86 D6 55 59
B7 D4 A4 10 F8 AE 79 B9 52 F0 2B 2E C1 56 43 56
All keys are 256 bit.

2. Sender encrypts the message (not including message header), and encodes the encrypted message using Base64 (eg. rIhJjXo+Shn15tj7RxHPwZiEpcGNyg==).

3. Sender then forwards the encrypted/encoded message as text (not flagged as encoded), and sends the key and the Message-ID to the server to be stored in a database.

4. Receiver retrieves the message, sees that it is encoded, and initiates decryption.

5. If the sender Domain recovered from the Message-ID (eg <41827.5099189815@key.domain.com>) is contained within the list of known encryption sources that the program keeps track of, then this step is skipped. Otherwise the receiver app displays the list of known encryption sources along with the current one, and the receiver is prompted to add it to the list with a warning. This step provides a degree of protection against phishing with encrypted messages.

6. At this point, both the sender and the receiver possess the encrypted message and the sender possesses the encryption key. The receiver then connects with the Domain Name from the Message-ID on a specified port, and sends the Message-ID and it's Elliptical Curve Public Key to the server.

7. The sender server looks up the Message-ID, and recovers the associated encryption Key. It then creates an Agreed Secret using it's own private ECC Key and the public ECC Key from the receiver. The encryption key is encrypted with the Agreed Secret and sent back to the receiver along with it's own public ECC Key. It then records the IP address and date/time used to recover the key. This step provides a degree of protection against the contents of the message being modified. Subsequent requests from non-authorized addresses are ignored.

8. The receiver creates the Agreed Secret using it's own private ECC Key and the public ECC Key from the server. This Agreed Secret is used to decrypt the encryption key from the server, which is then used to decrypt the Base64 decoded message. Finally, the key is saved in the receiver's database.

9. Subsequent requests to decrypt the message use the saved key.

10. The sender now knows when the message was read. Subsequent requests for the key would be highly suspicious and are blocked, with manual intervention required to unblock. If it is later discovered that an unauthorized request was made for the key from an unknown IP address, the contents of the message have probably been compromised.

Critics will say that the message could be intercepted, and the Msg-ID sent to the server to recover the Encryption Key. That is true, but one of the drawbacks of most encryption systems is that it is difficult to determine when it has been compromised. JACMail 2.5 overcomes that limitation.

Note: The service component requires the Microsoft NT Service Control (NTSVC.ocx).
Attached Images
 
Attached Files

API based random number generator for VB6

$
0
0
The built-in one in VB6 isn't all that good at creating highly random numbers (at least for cryptographic purposes). The crypto API is much better at this. Below is some sample code that you can put in a module that will let you use the Microsoft CryptoAPI random number generator.

Code:

Private Declare Function CryptAcquireContext Lib "advapi32.dll" Alias "CryptAcquireContextA" (ByRef phProv As Long, ByVal pszContainer As String, ByVal pszProvider As String, ByVal dwProvType As Long, ByVal dwFlags As Long) As Long
Private Declare Function CryptReleaseContext Lib "advapi32.dll" (ByVal hProv As Long, ByVal dwFlags As Long) As Long
Private Declare Function CryptGenRandom Lib "advapi32.dll" (ByVal hProv As Long, ByVal dwLen As Long, ByRef pbBuffer As Any) As Long

Private Const PROV_RSA_FULL As Long = 1
Private Const VERIFY_CONTEXT As Long = &HF0000000


Public Function GenRandom(ByVal ptrMemory As Long, ByVal lenMemory As Long)
    Dim hProv As Long
    CryptAcquireContext hProv, vbNullString, vbNullString, PROV_RSA_FULL, VERIFY_CONTEXT
    CryptGenRandom hProv, lenMemory, ByVal ptrMemory
    CryptReleaseContext hProv, 0
End Function


I use actual numerical pointers passed ByVal, instead of something like "ByRef MyArrayFirstCell As Byte" because the ByRef alternative would require passing it something specifically Byte-type and if I had a Long-type array (or any other type) it wouldn't work, and I can't use ByRef As Any with VB functions (it only works with DLL functions). This allows it to access ANY kind of variable to be used for holding the memory, with the one caveat that you will need to use VarPtr to get the actual memory address of the variable, in order to pass it to this function.

Refresh Windows of the IDE

$
0
0
This is a piece of code I wrote a while back to solve the annoyance of VB6 not always correctly repainting its various windows when another program's window moves off of them.

For years, I've just kept a shortcut to this program on my taskbar, and I click it anytime VB6 windows need a repaint.

To use it, just create a project with one module and no forms. This program just executes its Sub Main and then it's done.

I use it all the time, so I thought I'd share.

Code:

Option Explicit
'
Private Declare Function EnumWindows Lib "user32" (ByVal lpEnumFunc As Long, ByVal lParam As Long) As Long
Private Declare Function RedrawWindow Lib "user32" (ByVal hwnd As Long, lprcUpdate As Any, ByVal hrgnUpdate As Long, ByVal fuRedraw As Long) As Long
Private Declare Function OpenProcess Lib "kernel32" (ByVal dwDesiredAccess As Long, ByVal bInheritHandle As Long, ByVal dwProcessId As Long) As Long
Private Declare Function EnumProcessModules Lib "psapi" (ByVal hProcess As Long, lphModule As Long, ByVal cb As Long, lpcbNeeded As Long) As Long
Private Declare Function GetModuleFileNameEx Lib "psapi" Alias "GetModuleFileNameExA" (ByVal hProcess As Long, ByVal hModule As Long, ByVal lpFileName As String, ByVal nSize As Long) As Long
Private Declare Function GetModuleBaseName Lib "psapi" Alias "GetModuleBaseNameA" (ByVal hProcess As Long, ByVal hModule As Long, ByVal lpFileName As String, ByVal nSize As Long) As Long
Private Declare Function CloseHandle Lib "kernel32" (ByVal hObject As Long) As Long
Private Declare Function GetWindowLong Lib "user32" Alias "GetWindowLongA" (ByVal hwnd As Long, ByVal nIndex As Long) As Long
Private Declare Function GetWindowThreadProcessId Lib "user32" (ByVal hwnd As Long, lpdwProcessId As Long) As Long
'
Private Const RDW_INVALIDATE = &H1
Private Const PROCESS_ALL_ACCESS = &H1F0FFF
Private Const GWL_STYLE As Long = (-16)
Private Const WS_VISIBLE = &H10000000
'
Dim lTheProcessIdMatch As Long
Dim hWndCount As Long
Dim hWnds() As Long
'

Private Sub Main()
    Dim hWindows() As Long
    Dim i As Long
    '
    hWindows = hWndOfAllTopLevelWindows
    For i = 1 To UBound(hWindows)
        If WindowIsVisible(hWindows(i)) Then
            If LCase$(ExeFileName(hWindows(i))) = "vb6.exe" Then
                RedrawWindow hWindows(i), ByVal 0&, ByVal 0&, RDW_INVALIDATE
            End If
        End If
    Next i
End Sub

Private Function EnumWindowsCallBack(ByVal hwnd As Long, ByVal lpData As Long) As Long
    ' Only the API calls this.  It should not be called by user.
    '
    ' This callback function is called by Windows (from the EnumWindows
    ' API call) for EVERY window that exists.  It populates the aWindowList
    ' array with a list of windows that we are interested in.
    '
    EnumWindowsCallBack = 1
    '
    If lTheProcessIdMatch = 0 Or ProcessId(hwnd) = lTheProcessIdMatch Then
        hWndCount = hWndCount + 1
        If UBound(hWnds) < hWndCount Then ReDim Preserve hWnds(1 To UBound(hWnds) + 100)
        hWnds(hWndCount) = hwnd
    End If
End Function

Private Function hWndOfAllTopLevelWindows(Optional lProcessIdMatch As Long = 0) As Long()
    '
    ' The EnumWindows function enumerates all top-level windows
    ' on the screen by passing the handle of each window, in turn,
    ' to an application-defined callback function. EnumWindows
    ' continues until the last top-level window is enumerated or
    ' the callback function returns FALSE.
    '
    ' This can also be done with GetWindows, but this is more reliable and with less risk of crashing because of windows destroyed while looping.
    lTheProcessIdMatch = lProcessIdMatch
    hWndCount = 0
    ReDim hWnds(1 To 100)
    EnumWindows AddressOf EnumWindowsCallBack, &H0 ' Doesn't return until done.
    If hWndCount > 0 Then
        ReDim Preserve hWnds(1 To hWndCount)
    Else
        Erase hWnds
    End If
    '
    hWndOfAllTopLevelWindows = hWnds
End Function

Private Function ExeFileName(hWndOfInterest As Long, Optional FullSpec As Boolean = False) As String
    Dim rtn As Long
    Dim lProcMods() As Long
    Dim sFileName As String * 260
    Dim lSize As Long
    Dim lRequired As Long
    Dim hProcess As Long
    Dim hWndOfFormWithFocus As Long
    Dim l As Long
    '
    lSize = 4
    ReDim lProcMods(0)
    '
    hProcess = OpenProcess(PROCESS_ALL_ACCESS, 0&, ProcessId(hWndOfInterest))
    ' Enumerate modules.
    rtn = EnumProcessModules(hProcess, lProcMods(0), lSize, lRequired)
    ' If array is not large enough to hold all results, number of bytes required is in lRequired.
    If lRequired > lSize Then
        lSize = lRequired
        ReDim lProcMods(0 To (lSize / 4) - 1)
        rtn = EnumProcessModules(hProcess, lProcMods(0), lSize, lRequired)
    End If
    ' lProcMods() now holds the list of module handles associated with the process.
    ' The zeroth element is the main program.
    If FullSpec Then
        rtn = GetModuleFileNameEx(hProcess, lProcMods(0), sFileName, Len(sFileName))
    Else
        rtn = GetModuleBaseName(hProcess, lProcMods(0), sFileName, Len(sFileName))
    End If
    ExeFileName = Left$(sFileName, rtn)
    rtn = CloseHandle(hProcess)
End Function

Private Function WindowIsVisible(hWndOfInterest As Long) As Boolean
    WindowIsVisible = ((GetWindowLong(hWndOfInterest, GWL_STYLE) And WS_VISIBLE) = WS_VISIBLE)
End Function
   
Private Function ProcessId(hWndOfInterest As Long) As Long
    ' This process ID is unique to the entire application to which the window belongs.
    ' A process ID will always be unique for each running copy of an application, even if more than one copy is running.
    Dim lProcId As Long
    Call GetWindowThreadProcessId(hWndOfInterest, lProcId)
    ProcessId = lProcId
End Function

[VB6] Code Snippet: Drag drop any format to other apps without custom IDataObject

$
0
0
While I've got a thread going about how to do this the right way and actually implement an IDataObject, in the mean time I thought I'd post a trick that you can use to dragdrop any format without one.

Normally, to drag text to another app, you'd have to create an implementation of IDataObject in a class, then implement all its methods and support CF_TEXT and/or CF_UNICODETEXT and others you wanted. However, if you were just looking to copy files with CF_HDROP, you may have seen my other project where there's an API that does this for you-- SHCreateDataObject. There's not a direct equivalent for any other CF_ format, but it turns out that you can call that API without actually specifying a file, and still get back a fully functional default IDataObject from Windows instead of rolling your own custom one, which you can then add your desired formats to. This is still far less code and far easier than providing a custom implementation.

Requirements
-Windows Vista or higher*
-oleexp3.tlb with mIID.bas (although any typelib with a normal IDataObject def could be substituted)

Code
Primary code to create and drag, typically called from a MouseDown event:
Code:

Public Declare Function SHCreateDataObject Lib "shell32" (ByVal pidlFolder As Long, ByVal cidl As Long, ByVal apidl As Long, pdtInner As Any, riid As UUID, ppv As Any) As Long
Public Declare Function SHDoDragDrop Lib "shell32" (ByVal hwnd As Long, ByVal pdtobj As Long, ByVal pdsrc As Long, ByVal dwEffect As Long, pdwEffect As Long) As Long

Public Sub DoDrag()
Dim pDataObj As oleexp3.IDataObject

Call SHCreateDataObject(0&, 0&, 0&, ByVal 0&, IID_IDataObject, pDataObj)

If (pDataObj Is Nothing) Then
    Debug.Print "couldn't get ido"
Else
    Debug.Print "got ido"
    IDO_AddTextW pDataObj, "TextWTest"
    IDO_AddTextA pDataObj, "TextATest"
    Dim lp As Long
    Dim hr As Long
    hr = SHDoDragDrop(Me.hwnd, ObjPtr(pDataObj), 0&, DROPEFFECT_COPY, lp)
    Set pDataObj = Nothing
End If
End Sub

The example above adds two formats to the blank IDataObject, CF_TEXT (IDO_AddTextA) and CF_UNICODETEXT (IDO_AddTextW):
Code:

Public Declare Function GlobalAlloc Lib "kernel32" (ByVal wFlags As Long, ByVal dwBytes As Long) As Long
Public Declare Function GlobalFree Lib "kernel32" (ByVal hMem As Long) As Long
Public Declare Function GlobalLock Lib "kernel32" (ByVal hMem As Long) As Long
Public Declare Function GlobalUnlock Lib "kernel32" (ByVal hMem As Long) As Long
Public Declare Sub CopyMemory Lib "kernel32" Alias "RtlMoveMemory" (Destination As Any, Source As Any, ByVal Length As Long)

Public Sub IDO_AddTextW(ido As oleexp3.IDataObject, sText As String)
Dim fmt As FORMATETC
Dim stg As STGMEDIUM
Dim hGlobal As Long, lpGlobal As Long
Dim sz As String
sz = sText & vbNullChar
hGlobal = GlobalAlloc(GPTR, LenB(sz))
If hGlobal Then
    lpGlobal = GlobalLock(hGlobal)
    Call CopyMemory(ByVal lpGlobal, ByVal StrPtr(sz), LenB(sz))
    Call GlobalUnlock(hGlobal)
    stg.TYMED = TYMED_HGLOBAL
    stg.Data = lpGlobal
    fmt.cfFormat = CF_UNICODETEXT
    fmt.dwAspect = DVASPECT_CONTENT
    fmt.lIndex = -1
    fmt.TYMED = TYMED_HGLOBAL
    ido.SetData fmt, stg, 1
End If

End Sub
Public Sub IDO_AddTextA(ido As oleexp3.IDataObject, sText As String)
Dim fmt As FORMATETC
Dim stg As STGMEDIUM
Dim hGlobal As Long, lpGlobal As Long
Dim b() As Byte

hGlobal = GlobalAlloc(GPTR, Len(sText) + 1)
If hGlobal Then
    lpGlobal = GlobalLock(hGlobal)
    b = StrConv(sText & vbNullChar, vbFromUnicode)
    CopyMemory ByVal lpGlobal, b(0), UBound(b) + 1
    Call GlobalUnlock(hGlobal)
    stg.TYMED = TYMED_HGLOBAL
    stg.Data = lpGlobal
    fmt.cfFormat = CF_TEXT
    fmt.dwAspect = DVASPECT_CONTENT
    fmt.lIndex = -1
    fmt.TYMED = TYMED_HGLOBAL
    ido.SetData fmt, stg, 1
End If
End Sub

You can follow the same basic procedure to add any formats you want to your IDataObject. As another example, here's how to drag a PNG image from the file on disk, which shows the technique for dragging file contents:

Code:

Public Declare Function RegisterClipboardFormatW Lib "user32" (ByVal lpszFormat As Long) As Long
Public Declare Function CreateFileW Lib "kernel32" (ByVal lpFileName As Long, ByVal dwDesiredAccess As Long, ByVal dwShareMode As Long, ByVal lpSecurityAttributes As Any, ByVal dwCreationDisposition As Long, ByVal dwFlagsAndAttributes As Long, ByVal hTemplateFile As Long) As Long
Public Declare Function GetFileSize Lib "kernel32" (ByVal hFile As Long, lpFileSizeHigh As Long) As Long
Public Declare Function ReadFile Lib "kernel32" (ByVal hFile As Long, lpBuffer As Any, ByVal nNumberOfBytesToRead As Long, lpNumberOfBytesRead As Long, ByVal lpOverlapped As Any) As Long
Public Declare Function CloseHandle Lib "kernel32" (ByVal hObject As Long) As Long

Public Const FILE_READ_DATA = &H1
Public Const FILE_SHARE_READ = &H1&
Public Const OPEN_EXISTING = 3&

Public Sub IDO_AddPNG(pDataObj As oleexp3.IDataObject, sPng As String)
Dim fmt As FORMATETC
Dim stg As STGMEDIUM
Dim hGlobal As Long, lpGlobal As Long
Dim hFile As Long, nFile As Long, lp As Long
Dim bPNG() As Byte
hFile = CreateFileW(StrPtr(sPng), FILE_READ_DATA, FILE_SHARE_READ, ByVal 0&, OPEN_EXISTING, 0, 0)
If hFile Then
    nFile = GetFileSize(hFile, lp)
    Debug.Print "high=" & nFile & ",low=" & lp
    ReDim bPNG(nFile)
    ReadFile hFile, bPNG(0), nFile, lp, 0&
    CloseHandle hFile
    If lp > 0& Then

    hGlobal = GlobalAlloc(GPTR, UBound(bPNG) + 1)
    If hGlobal Then
        lpGlobal = GlobalLock(hGlobal)
        CopyMemory ByVal lpGlobal, bPNG(0), UBound(bPNG) + 1
        Call GlobalUnlock(hGlobal)
        stg.TYMED = TYMED_HGLOBAL
        stg.Data = lpGlobal
        fmt.cfFormat = RegisterClipboardFormatW(StrPtr(CFSTR_PNG))
        fmt.dwAspect = DVASPECT_CONTENT
        fmt.lIndex = -1
        fmt.TYMED = TYMED_HGLOBAL
        pDataObj.SetData fmt, stg, 1
    End If 'memalloc

    End If 'bytesread>0
End If
End Sub

You can add multiple formats to the same object; it's the drop target that decides which it can accept and display.

Since it's a custom format, we don't get the benefit of a default icon anymore. But making a drag image isn't too hard; we can use the IDragSourceHelper interface for that. If you've got a control you're dragging from that does drag images, you can use InitializeFromWindow, but if you want full control you can create the entire image yourself. Here's an IDO_AddPNGEx routine that does just that:
Code:

Public Declare Function ILCreateFromPathW Lib "shell32" (ByVal pwszPath As Long) As Long
Public Declare Function SHCreateItemFromIDList Lib "shell32" (ByVal pidl As Long, riid As UUID, ppv As Any) As Long
Public Declare Sub CoTaskMemFree Lib "ole32.dll" (ByVal PV As Long) ' Frees memory allocated by the shell

Public Sub IDO_AddPNGEx(pDataObj As oleexp3.IDataObject, sPng As String)
Dim fmt As FORMATETC
Dim stg As STGMEDIUM
Dim hGlobal As Long, lpGlobal As Long
Dim lpFmt As Long
Dim hFile As Long, nFile As Long, lp As Long
Dim bPNG() As Byte
hFile = CreateFileW(StrPtr(sPng), FILE_READ_DATA, FILE_SHARE_READ, ByVal 0&, OPEN_EXISTING, 0, 0)
If hFile Then
    nFile = GetFileSize(hFile, lp)
    Debug.Print "high=" & nFile & ",low=" & lp
    ReDim bPNG(nFile)
    ReadFile hFile, bPNG(0), nFile, lp, 0&
    CloseHandle hFile
    If lp > 0& Then
        hGlobal = GlobalAlloc(GPTR, UBound(bPNG) + 1)
        If hGlobal Then
            lpGlobal = GlobalLock(hGlobal)
            CopyMemory ByVal lpGlobal, bPNG(0), UBound(bPNG) + 1
            Call GlobalUnlock(hGlobal)
            stg.TYMED = TYMED_HGLOBAL
            stg.Data = lpGlobal
            fmt.cfFormat = CF_PNG
            fmt.dwAspect = DVASPECT_CONTENT
            fmt.lIndex = -1
            fmt.TYMED = TYMED_HGLOBAL
            pDataObj.SetData fmt, stg, 1
           
            'set thumbnail for drag
            Dim pHelper As IDragSourceHelper2
            Set pHelper = New DragDropHelper
            Dim tImg As SHDRAGIMAGE
            GetFileThumbForIDSH sPng, tImg
            pHelper.SetFlags 0&
            pHelper.InitializeFromBitmap tImg, pDataObj
        End If
    End If
End If
End Sub
Private Sub GetFileThumbForIDSH(sFile As String, tSDI As SHDRAGIMAGE, Optional cx As Long = 16, Optional cy As Long = 16)
'This method is Vista-only; you can fall back to IExtractImage or others if you're trying to support XP still
Dim pidl As Long
Dim isiif As IShellItemImageFactory
pidl = ILCreateFromPathW(StrPtr(sFile))
Call SHCreateItemFromIDList(pidl, IID_IShellItemImageFactory, isiif)
If (isiif Is Nothing) = False Then
    isiif.GetImage cx, cy, SIIGBF_THUMBNAILONLY, tSDI.hbmpDragImage
    tSDI.sizeDragImage.cx = cx
    tSDI.sizeDragImage.cy = cy
'        tSDI.ptOffset.x = 15 'you can add an offset to see it better, but the drop x,y won't change
'        tSDI.ptOffset.Y = 15
Else
    Debug.Print "GetFileThumbForIDSH::Failed to get IShellItemImageFactory"
End If
Call CoTaskMemFree(pidl)
End Sub

A 32x32 drag image thumbnail of a PNG being dragged, next to it after being dropped and rendered at full size (see next post):


And finally, you can also set a default drop description (although drop targets frequently set their own):

First, in IDO_AddPNGEx, change pHelper.SetFlags 0& to pHelper.SetFlags DSH_ALLOWDROPDESCRIPTIONTEXT
Then immediately after IDO_AddPNGEx, add IDO_AddDropDesc pDataObj, DROPIMAGE_LABEL, "Drop %1 here", "MyPNG"
Code:

Public Sub IDO_AddDropDesc(ido As oleexp3.IDataObject, nType As DROPIMAGETYPE, sMsg As String, sIns As String)
Dim fmt As FORMATETC
Dim stg As STGMEDIUM
Dim tDD As DROPDESCRIPTION
Dim iTmp1() As Integer
Dim iTmp2() As Integer
Dim hGlobal As Long, lpGlobal As Long
Dim i As Long
On Error GoTo e0

Str2WCHAR sMsg, iTmp1
Str2WCHAR sIns, iTmp2

For i = 0 To UBound(iTmp1)
    tDD.szMessage(i) = iTmp1(i)
Next i

For i = 0 To UBound(iTmp2)
    tDD.szInsert(i) = iTmp2(i)
Next i
tDD.type = nType

hGlobal = GlobalAlloc(GHND, LenB(tDD))
If hGlobal Then
    lpGlobal = GlobalLock(hGlobal)
    Call CopyMemory(ByVal lpGlobal, tDD, LenB(tDD))
    Call GlobalUnlock(hGlobal)
    stg.TYMED = TYMED_HGLOBAL
    stg.Data = lpGlobal
    fmt.cfFormat = RegisterClipboardFormatW(StrPtr(CFSTR_DROPDESCRIPTION)) 'CF_DROPDESCRIPTION
    fmt.dwAspect = DVASPECT_CONTENT
    fmt.lIndex = -1
    fmt.TYMED = TYMED_HGLOBAL
    ido.SetData fmt, stg, 1
End If
Exit Sub
e0:
    Debug.Print "IDO_AddDropDesc->" & Err.Description
End Sub
Private Sub Str2WCHAR(sz As String, iOut() As Integer)
Dim i As Long
ReDim iOut(255)
For i = 1 To Len(sz)
    iOut(i - 1) = AscW(Mid(sz, i, 1))
Next i
End Sub

--------------------------------
* - Normally I would use the undocumented SHCreateFileDataObject and retain XP support, but with this usage the IDataObject it creates returns with several additional formats inserted with blank or corrupt data. If XP support is a requirement you can try it and see if the formats are a problem for your usage or not.

How to convert StdPicture into pixel array

$
0
0
Here's some code you can put in a module, that will let you convert any StdPicture object into an ordinary byte array that contains the pixel data in 32bit-per-pixel format. In addition to it being 32bit, it makes sure that the value for field Height in the BitmapInfoHeader structure used in the conversion is a negative number, so that the first row of pixels (y=0) is always at the top (like with most image formats) rather than at the bottom (like it usually is for BMP files). The below code is fully commented, so you can see how it works.
Code:

Private Declare Function GetDIBits Lib "gdi32.dll" (ByVal hDC As Long, ByVal hBitmap As Long, ByVal nStartScan As Long, ByVal nNumScans As Long, ByRef lpBits As Any, ByRef lpBI As BITMAPINFO, ByVal wUsage As Long) As Long
Private Declare Function CreateCompatibleDC Lib "gdi32.dll" (ByVal hDC As Long) As Long
Private Declare Function DeleteDC Lib "gdi32.dll" (ByVal hDC As Long) As Long

Private Type BITMAPINFOHEADER
    biSize As Long
    biWidth As Long
    biHeight As Long
    biPlanes As Integer
    biBitCount As Integer
    biCompression As Long
    biSizeImage As Long
    biXPelsPerMeter As Long
    biYPelsPerMeter As Long
    biClrUsed As Long
    biClrImportant As Long
End Type

Private Type RGBQUAD
    rgbBlue As Byte
    rgbGreen As Byte
    rgbRed As Byte
    rgbReserved As Byte
End Type

Private Type BITMAPINFO
    bmiHeader As BITMAPINFOHEADER
    bmiColors As RGBQUAD
End Type


Public Function StdPictureToPix(ByRef Picture As StdPicture) As Byte()
    Dim Pix() As Byte
    Dim BMI As BITMAPINFO
    Dim Width As Long
    Dim Height As Long
    Dim hDC As Long
   
   
    hDC = CreateCompatibleDC(0) 'Create a temporary in-memory device context
    BMI.bmiHeader.biSize = Len(BMI.bmiHeader) 'Initialize BitmapInfoHeader with header size
    GetDIBits hDC, Picture.Handle, 0, 0, ByVal 0&, BMI, 0 'Get Information about the image
   
    'Set up BitmapInfoHeader for getting the pixel data in 32bit format, and with y=0 on the top
    With BMI.bmiHeader
        .biBitCount = 32
        .biClrUsed = 0
        .biClrImportant = 0
        .biSizeImage = 0
        .biCompression = 0
        Width = .biWidth
        Height = Abs(.biHeight)
        .biHeight = -Height
    End With
    '32bit format has, for each pixel, 3 color channels in the order B, G, R, and an unused channel
    'This always satisfies the condition that each image row must have a multiple-of-4 byte count
   
    ReDim Pix(3, Width - 1, Height - 1) 'Initialize array for holding pixel data
    GetDIBits hDC, Picture.Handle, 0, Height, Pix(0, 0, 0), BMI, 0 'Get pixel data
    DeleteDC hDC 'Get rid of temporary in-memory device context
   
    StdPictureToPix = Pix()
End Function

After calling this to get the pixels in an array, to get the width you just need to do UBound(arrayname,2)+1 to get the width in the calling function, and UBound(arrayname,3)+1 to get the height. UBound(arrayname,1)+1 always is 4, because there are 4 bytes per pixel, and the first dimension in the array is the color channel selector (0=B, 1=G, 2=R, 3=unused). Here's some sample code for sample code for how to use it to load a picture file directly into a byte array, and then displaying it to the form (albeit using the inefficient PSet statement).
Code:

Private Sub Form_Load()
    Dim x As Long
    Dim y As Long
    Dim Pix() As Byte
    Dim Img As New ImageFile
   
    Pix() = StdPictureToPix(LoadPicture("picturefile.jpg"))
    Show
    For y = 0 To UBound(Pix, 3)
        For x = 0 To UBound(Pix, 2)
            PSet (x, y), RGB(Pix(2, x, y), Pix(1, x, y), Pix(0, x, y))
        Next x
        DoEvents
    Next y
End Sub

Note that LoadPicture only works with BMP, JPG, and GIF formats. If you want to support TIF and PNG, you will need to use WIA 2.0, which comes with all versions of Windows since Vista, but not XP (though it might be available in Windows XP with SP3).

General purpose SxS manifest file

$
0
0
Hello All,

I've assembled a .manifest file that allows for Side-by-Side, registration-free execution of compiled VB6 programs using any (or all) of the following OCX files:
  • tabctl32.ocx
  • comdlg32.ocx
  • richtx32.ocx
  • mscomctl.ocx
  • mscomct2.ocx

The name of this manifest file (attached) is "AllPurposeManifest.txt". To use it, download it, and then rename it to the name of your compiled VB6 program, with the EXE and appending a .manifest after that. For instance, if your compiled program was named "MyProg.exe", then the manifest file would be named "MyProg.exe.manifest".

Now, to use it, this manifest file MUST be in the same folder with your EXE file. In addition, all of the above OCX files must also be in the same folder with your EXE file. These OCX files are somewhat version dependent. Also, since they're all redistributable, I've zipped them up and put them in a place you can down load them. To download them click HERE.

This manifest file is an ANSI Notepad readable file, so feel free to take a look at it.

Also, I've attached the source code to an example project named AllPurpose (attached as AllPurposeDemo.zip). To see this demo in action, download it, compile it, rename the manifest file to AllPurpose.exe.manifest, place this manifest file in the folder with the exe, place all the OCX files in this folder as well, and then execute it. (I didn't include the RichTextbox in this demo because that creates a binary frx file, and these binary files are not allowed in attachments in these forums. However, it is referenced and you can include it yourself on the demo form if you like.)

What are the advantages of doing this? First, it allows you a way to distribute your program without the need for any installation. In other words, you could just zip everything up (possibly excluding your source code files), and then unzip it on any modern Windows machine in a folder of your choice, and it'll just RUN! Secondly, keeping track of what OCX files you're using keeps you out of DLL hell. If you "install" your OCX files, there's nothing to prevent some other installer from "upgrading" them, potentially breaking your program. Just as an FYI, other than your own data files, all that would need to be in your distributable ZIP file is your EXE program, the manifest file (correctly named), and the OCX files. The VB6 runtime files are already pre-installed on all late versions of Windows.

There are also a couple of other things worth noting. First, this isn't necessarily the only way to assemble a registration-free (no installation needed) VB6 program. Krool (a participant in these forums) has done incredible work to develop VB6 custom controls (API created) for most of the controls people use from OCX files. If his work meets your needs, you could throw it all into your project, not having any references to OCX files, and you'd have a registration-free program.

There are also things other than side-by-side (runtime) registration of OCX files that can be placed in these manifest files. I'm not going to go into any of that here, but I will say that Dilettante (another participant in these forums) is quite knowledgeable about this information, and I will refer you to him if you'd like to know more (that is, if he's willing).

Lastly, if there's a "mainstream" OCX that you're using that's not in the above list, post the name of it in this thread, and I'll see about including it in the attached manifest file.

As a final note, none of this has anything to do with the VB6 IDE. This will only affect compiled programs.

Enjoy,
Elroy
Attached Files
Viewing all 1508 articles
Browse latest View live


<script src="https://jsc.adskeeper.com/r/s/rssing.com.1596347.js" async> </script>